100 Downloads Reached!!
Well dang, my funney little game reached 100 downloads, wild! In celebration I thought it'd be a rad opportunity to show my approach to creating the bedroom environment, with a few lil tidbits or hidden things thrown in. So let's go ahead and... listen to me ramble for a few minutes, I guess, it'll be cool I promise.
Vertex Colors
When it comes to making N64-esque environments, vertex colors are the hidden secret to make them look lush, colorful, and just plain gorgeous- as well as period-accurate!
Generally there are two ways to light a scene in 3D: you either use dynamic lights, or static lights.
Dynamic just means the scene is lit in realtime. You can manipulate the lighting at runtime to change color or brightness or angle, and use it to create cool effects, like a day/night cycle that slowly changes over time. The main issue is that dynamic lights take up processing power, and that was fairly limited on older hardware.
Static lighting, on the other hand, captures the lighting at a single point in time and bakes it right in. However this has its own downsides, as you can't change anything once it's baked in. You can't re-light anything, so you have to be thoughtful of when you use which. Plus, static lighting in modern day rendering uses separate lightmap textures, which eats up a lot of memory. It's not really something you'd see on the older consoles we're trying to emulate here.
Sooo what are we left with? How do we light our scene without slowly having to calculate dynamic lights for every pixel on screen, and without cranking out a whole second set of textures for the scene?
Well, why not bake the lighting right into the model itself?
3D models are made up of a collection of points, called vertices. Two can be bridged together to form an edge, and a third can connect to both of those to form a triangle-- your basic polygon! While you can take a flat image and stretch it over polygons to give them texture, there's an oft overlooked bit of data you can store in each vertex: *color!*
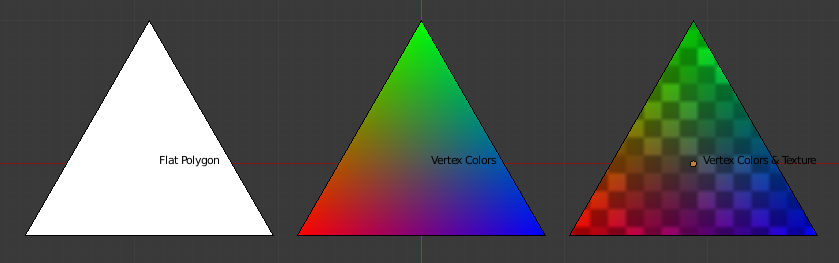
The three different point colors of a triangle will interpolate into one another, offering a smooth, if fairly limited, color gradient. Typically this will be multiplied over the base texture, giving you the detail of a texture and the depth of lighting!
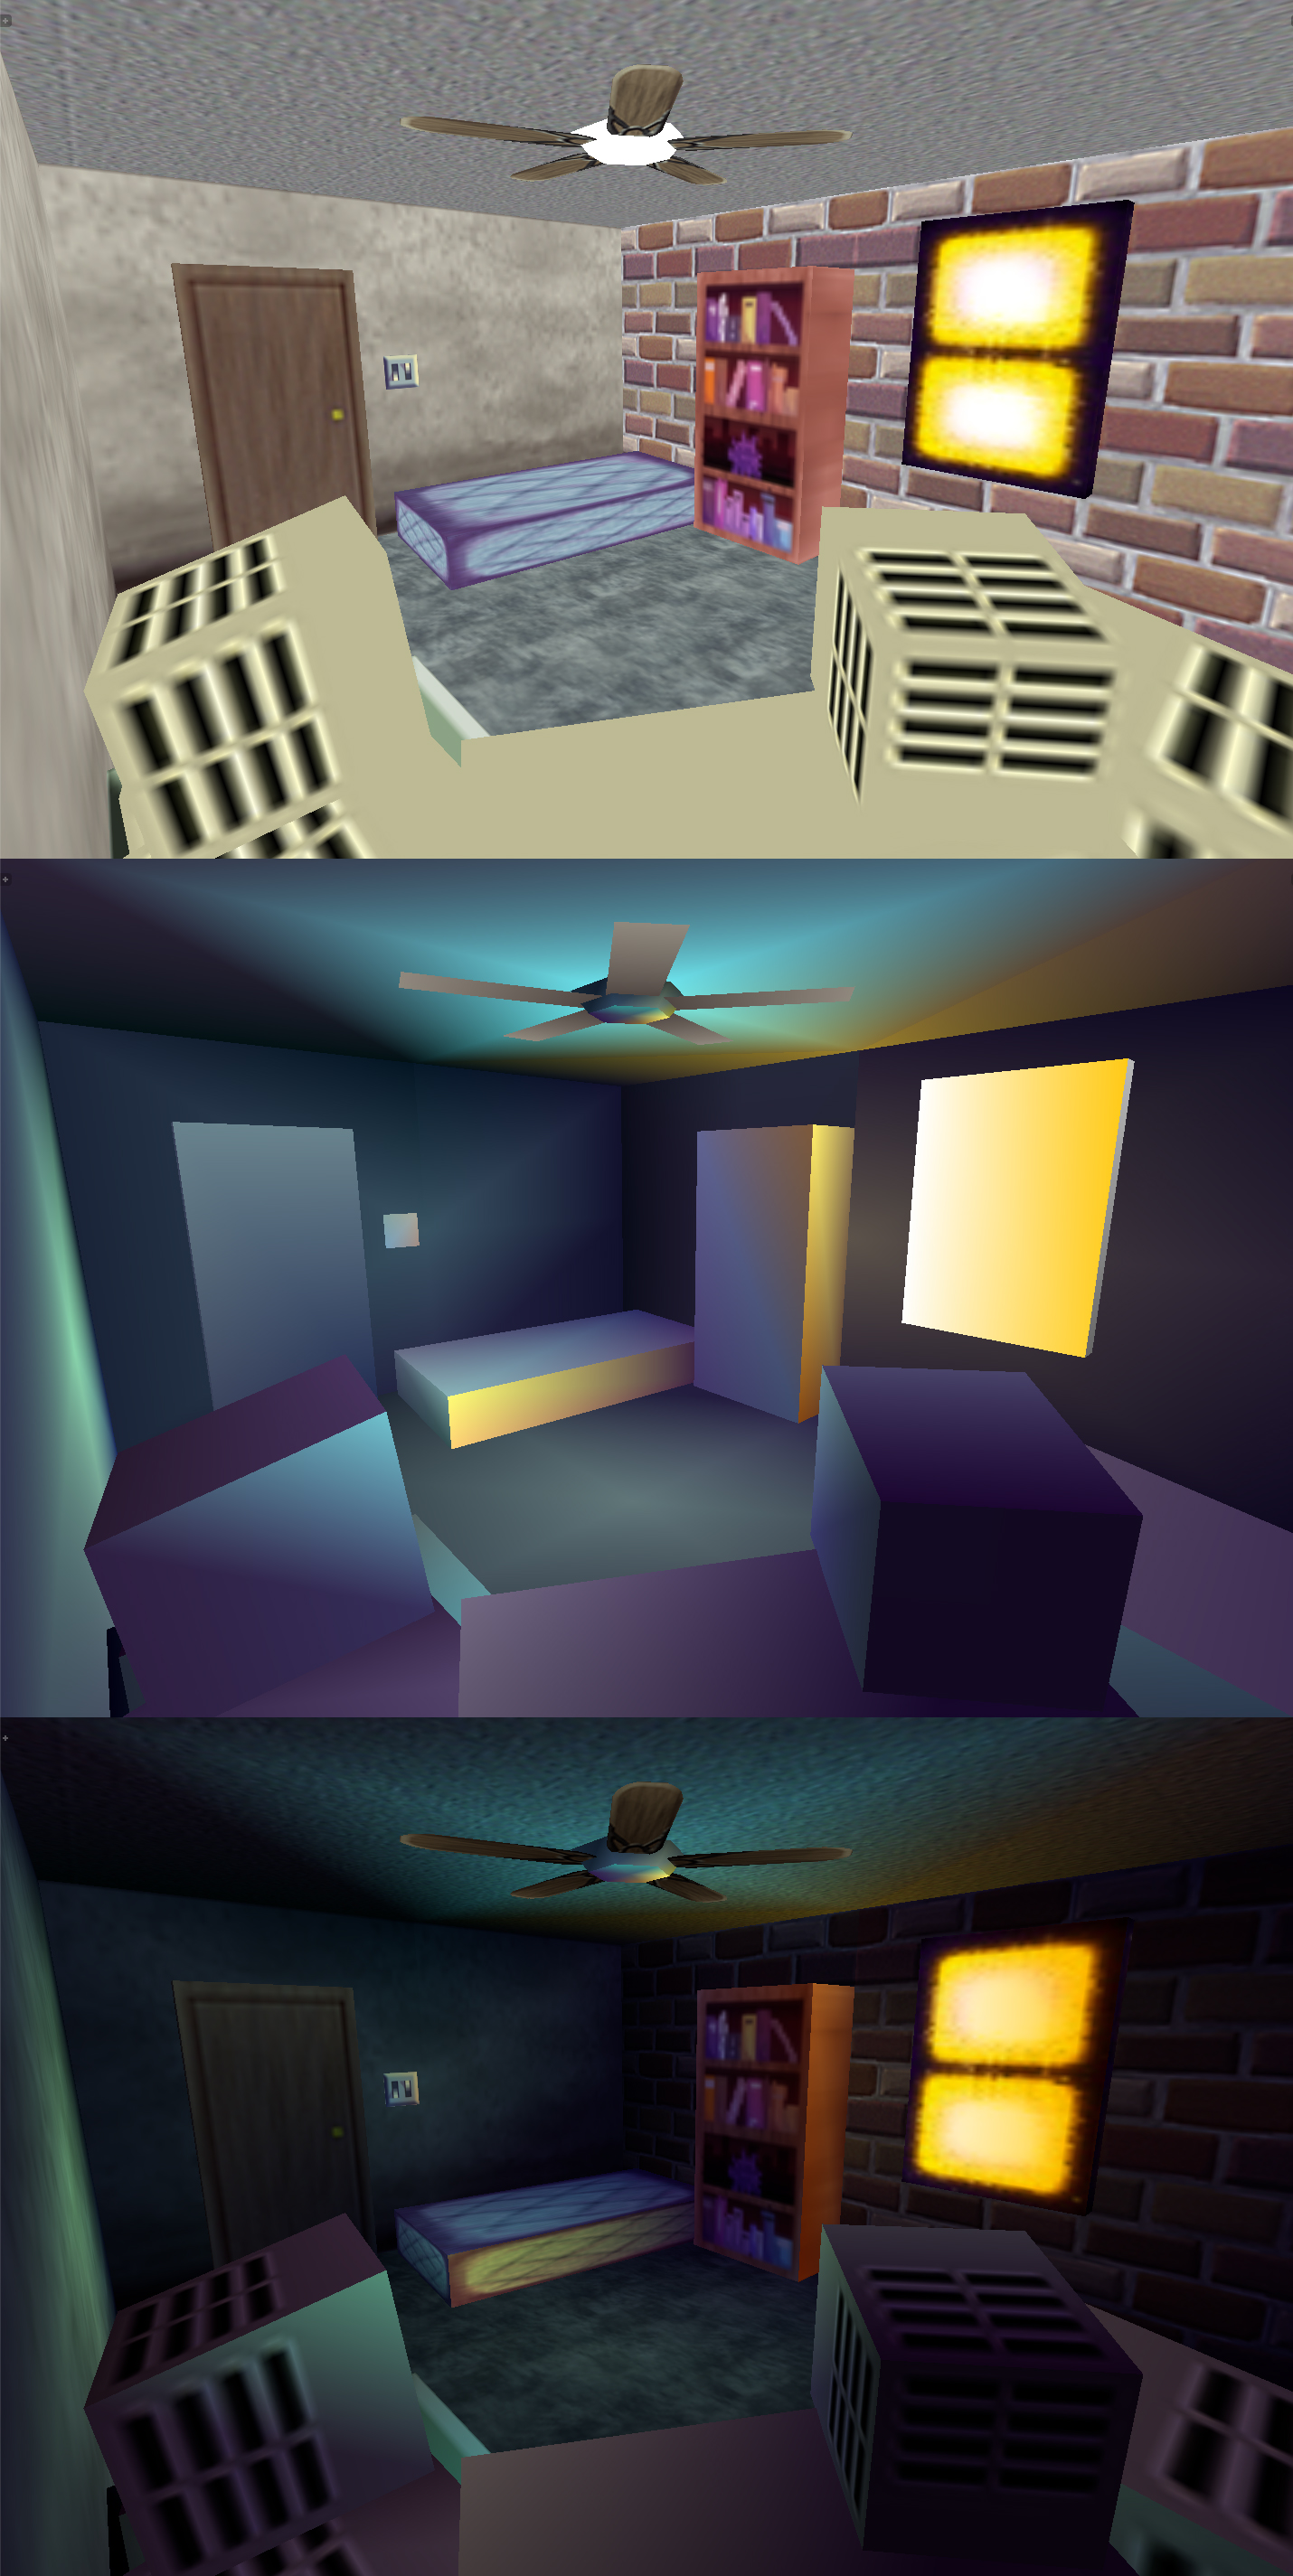
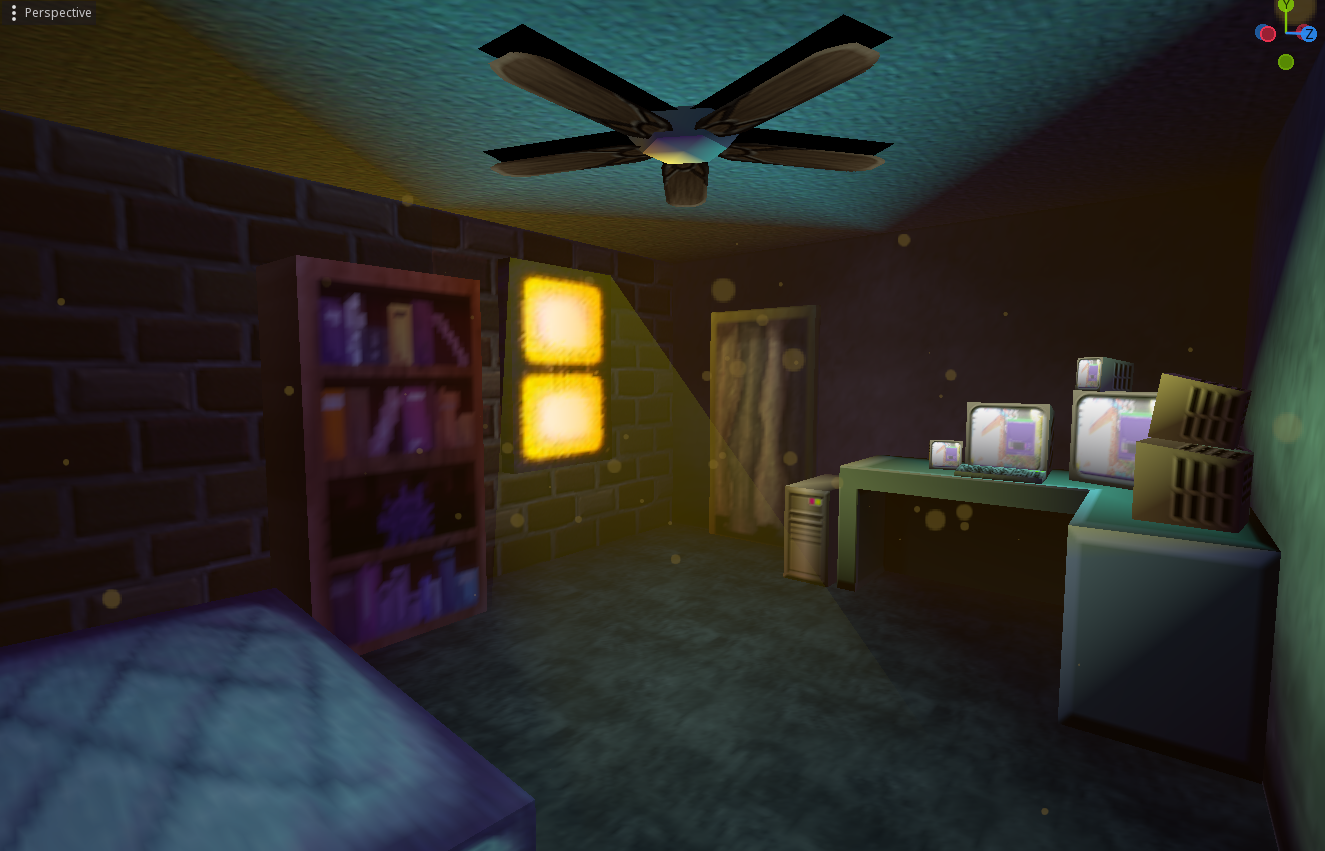
It's easiest to demonstrate with a visual example, so here's a shot of the bedroom in Blender:
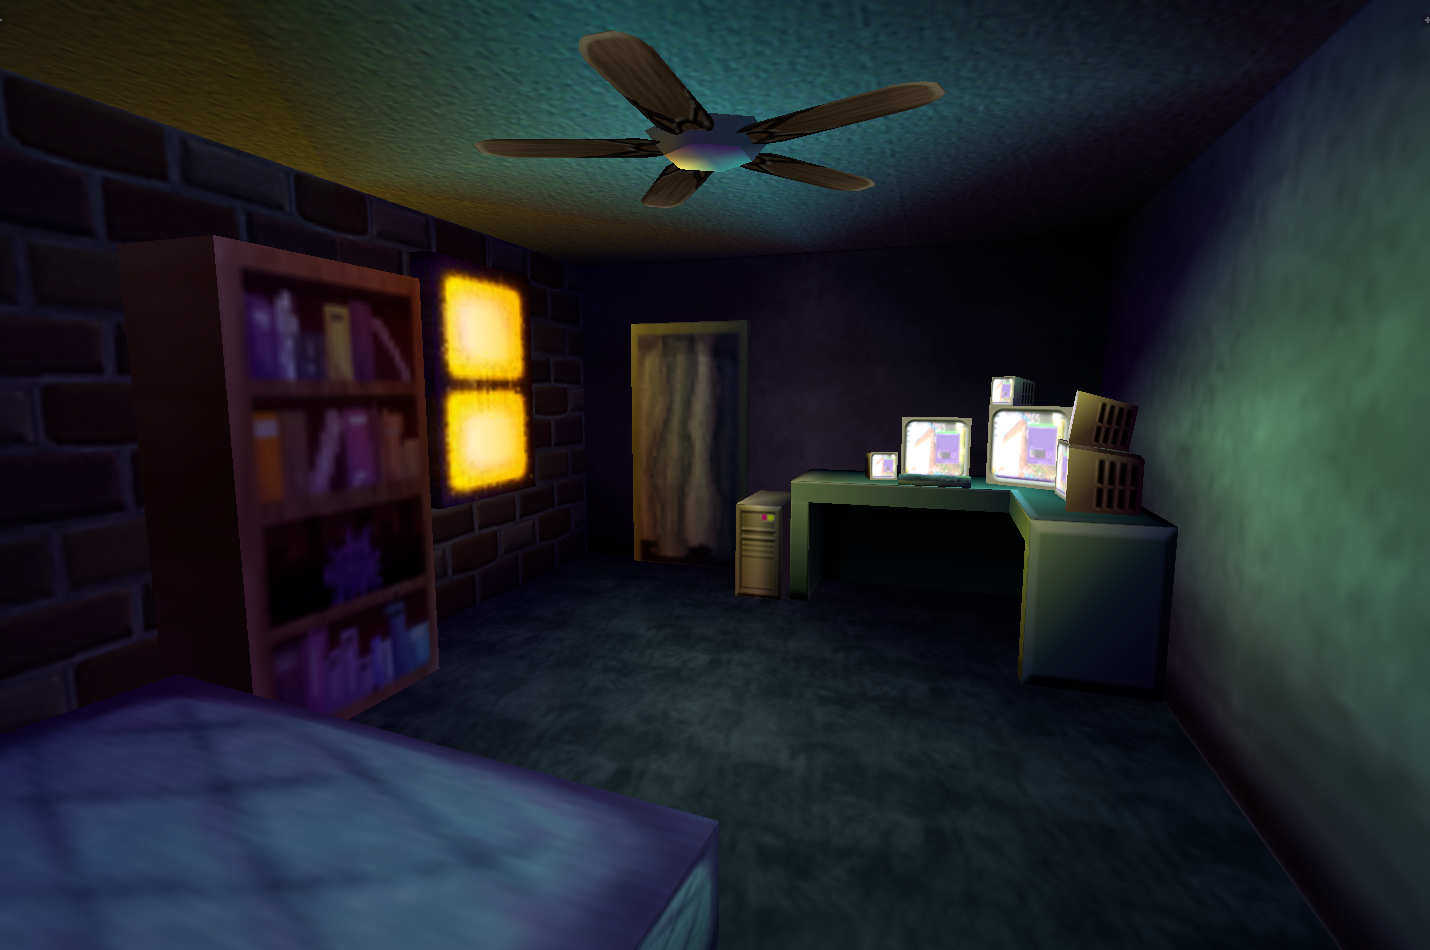
Let's break this down a bit: what can we see? Well there's a bright window to the left, which seems to be casting light onto the ceiling, fan, closet door, and desk. There's also a bookshelf on the left wall and a mattress below the camera. Given the orange glow of the sun from outside, it's safe to assume this is either early morning or late evening, just before the sun sets. And while the room isn't unkempt per se-- if anything it seems fairly tidy and organized-- the mattress is notably resting on the floor, without sheets or a blanket. There are several monitors on the desk, all blaring light onto the ceiling, and presumably into the face of whoever sits there. Other than that, the room is rather bare. Already we can start to infer a few things about Urchin's character: where their interests or comforts lie, how they take care of themselves and their space, and so on.
Environmental storytelling! Well, a light version of it anyway. But what does this all this have to do with vertex colors?
Let's disable them and see the textures underneath! Get a good look at the texture-work, and…

…oh no.
The detail is there, since we can still tell the brick from the wallpaper, the bookshelf from the mattress. But the mood is seemingly nowhere to be found! The idea of the sun or any sort of local light source has been obliterated, and what we're left with is a fully-lit room that appears flat and lifeless. Dramatic, I know, but this is what we're left with when we're rolling with just textures alone. It's hard to look at, difficult to discern where things are.
What happens if we reverse it, look at the vertex colors without texture?
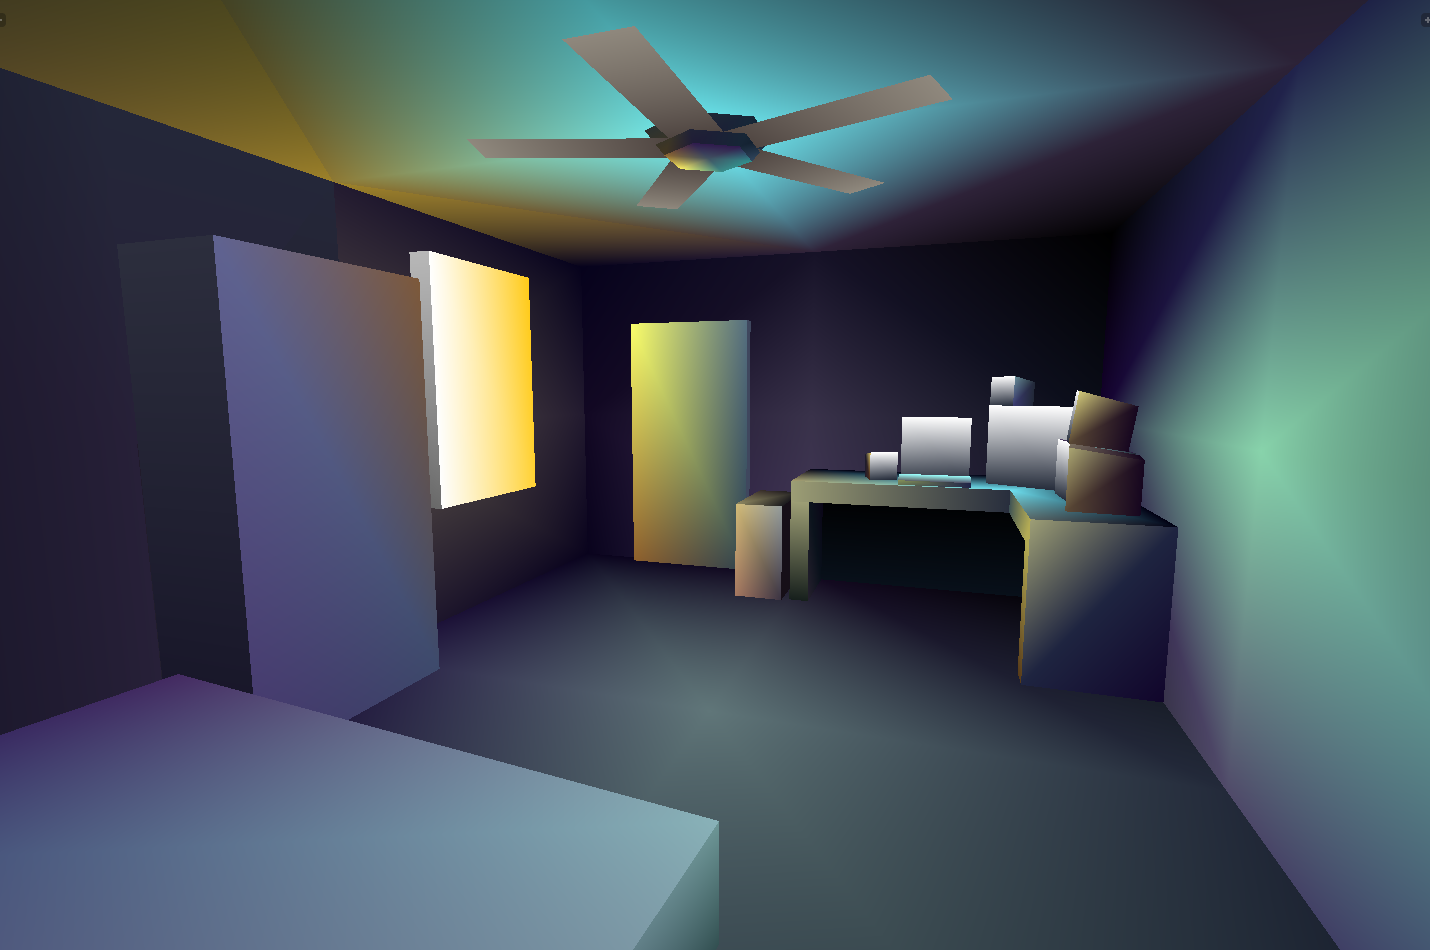
So the surface detail is gone, we're not entirely sure what these shapes are. But we can infer a fair amount solely by the size, shape, and placement of them, as we have a solid sense of where everything lies in 3D space. While the detail is gone, we still have the depth.
Thematically, it seems Urchin's room is usually kept fairly dim. The evening sunlight pouring in, while contending with the stark light in the corner and perhaps unwelcome, does cast a rather warm glow into an otherwise cold space. You get the feeling that once the sun sets, the harsh sting of the monitors will be the sole light source illuminating the room.
The mood is still here, despite taking away most of the details!
The mindset behind my own approach to N64-esque environments is this:
Textures carry the detail.
Vertex colors carry the vibe.
Of course, there are a number of approaches and methods for using vertex colors, and this is just one of 'em. Ultimately, the two work together to create a rich, detailed environment!
Here's a couple more examples from different angles:
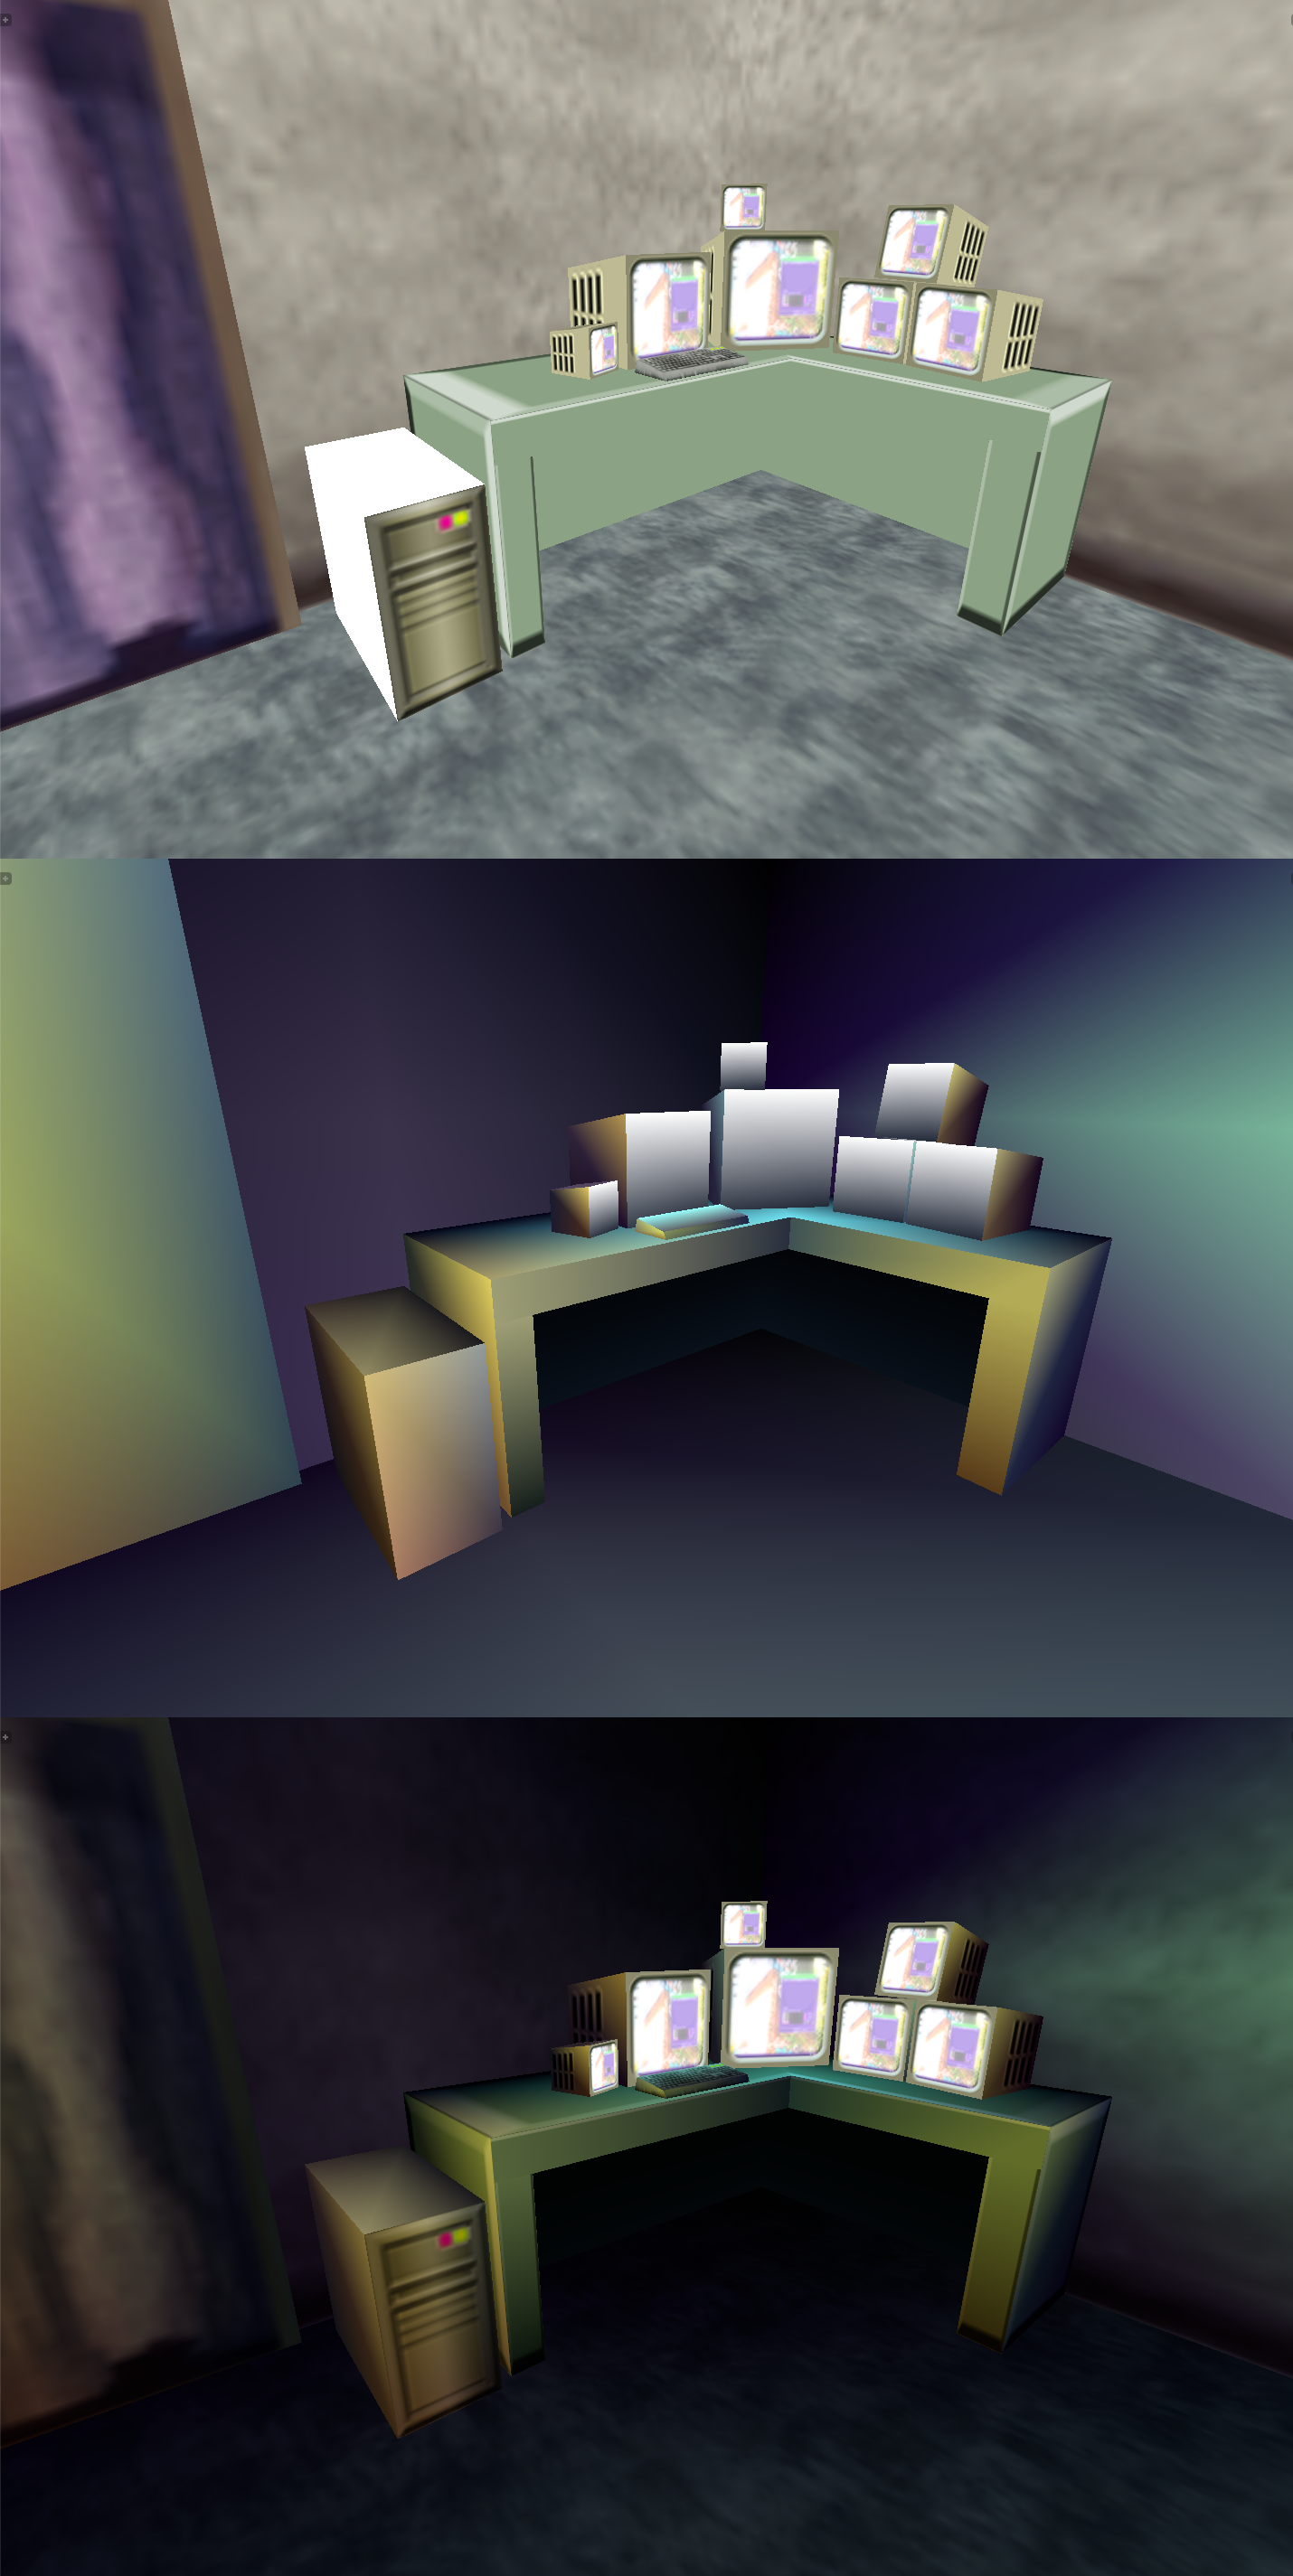
You may've noticed that the sides of the computer case don't actually have textures on them, only the front panel. If they're going to be mostly flat textures anyway, why waste precious (artificially) limited memory? That's one of the fun things about thinking with vertex colors: sometimes textures aren't even necessary! The same goes for the ceiling light as seen below.
While it's possible to generate vertex colors from realtime lights in Blender, personally I hand-paint all of them in myself. Is it slow, time-consuming, and tedious? Why yes it is!! But it's work I very much enjoy, and I love seeing an environment slowly come together, one vertex at a time.
I could babble on all day about how much I love this sort of thing and all the little technicalities involved, but ya get the point. If you want to discover more examples of this, try checking out noclip.website! It lets you view a bunch of environments from a variety of older games, and in some of them you can do fancy things like disable vertex color or textures individually, or reveal developer objects normally hid in game. For some cool low poly lighting shenanigans I personally recommend checking out Diddy Kong Racing, Banjo-Kazooie! And while it's not on noclip, Vagrant Story on PS1 is just… an astounding mastery of old-school rendering infused with bold style, it's WILD.
Fog!
Another relatively simple trick used on older hardware-- oftentimes out of necessity-- was fog. Originally used as a more graceful transition to mask short draw distances, it can also be used to set mood and tone with great effect!
Moving over to the game engine (Godot in this case), this is what the scene looks like imported from Blender after a lot of headache and hassle:
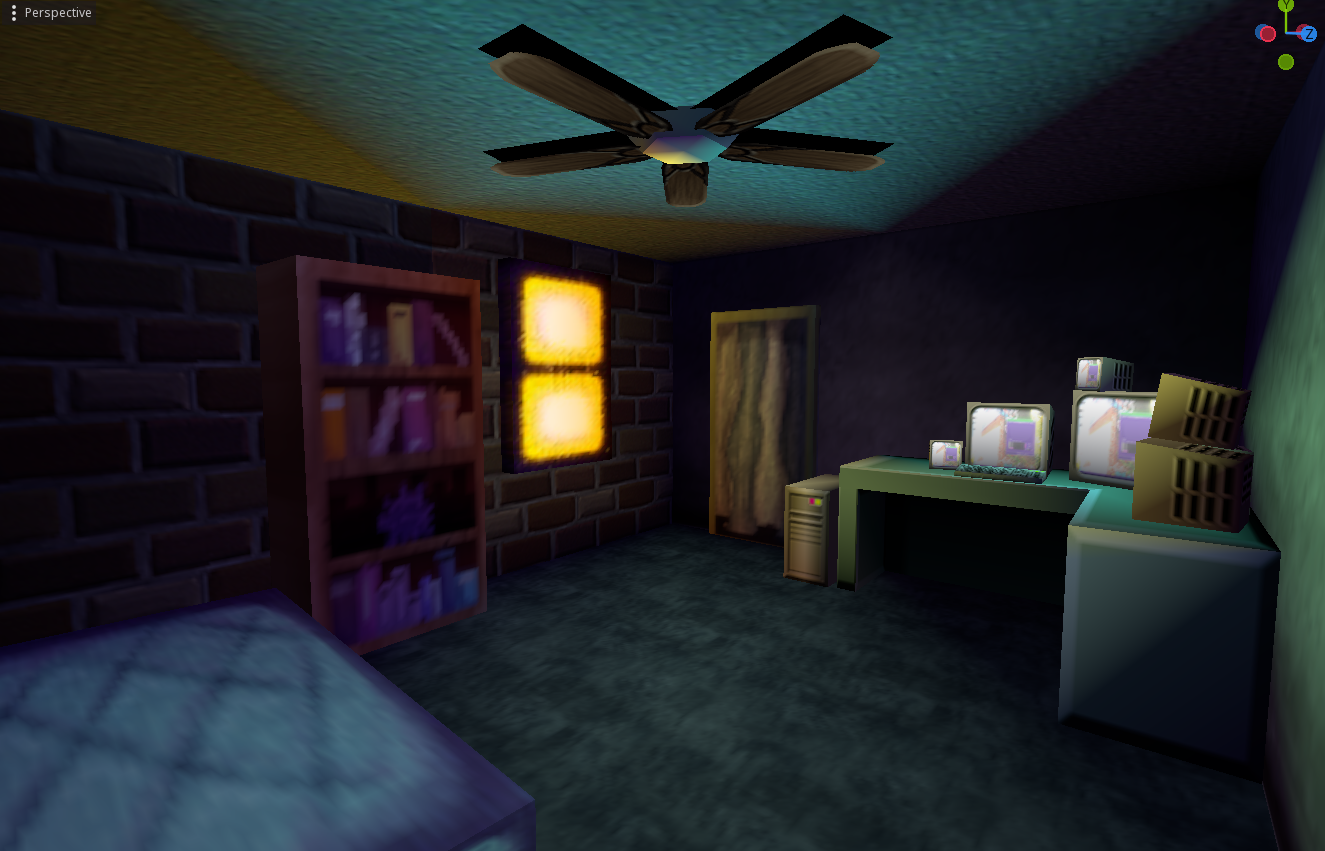
It's alright, but we can do better. We want to go for a hazy summer evening, so let's try a bit of orange fog applied to the whole scene:
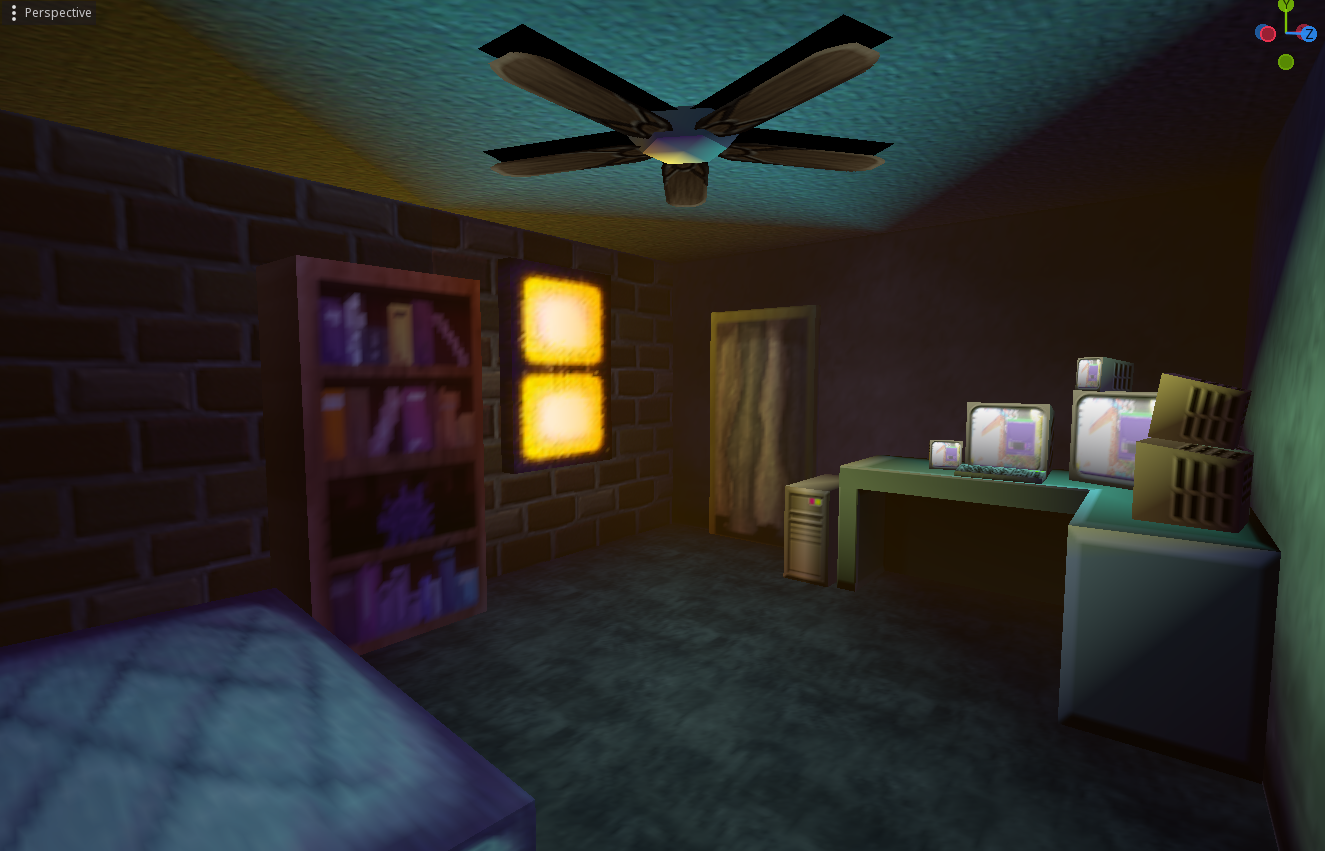
It's subtle, but it does a lot! It's most noticeable in the darker corners of the room, lifting several colors and textures into a unified tone the further they are from the camera. Especially when combined with the shaft of light from the window and dust particles swirling along with the fan, it gives the viewer a nice sense of "boy I sure don't want to open up that window, it must be hot and agonizingly humid outside"
Extras!
Let's end it off with a couple random bits to mention! First off is this uh… well admittedly I feel it's one of the most rushed textures in the game:
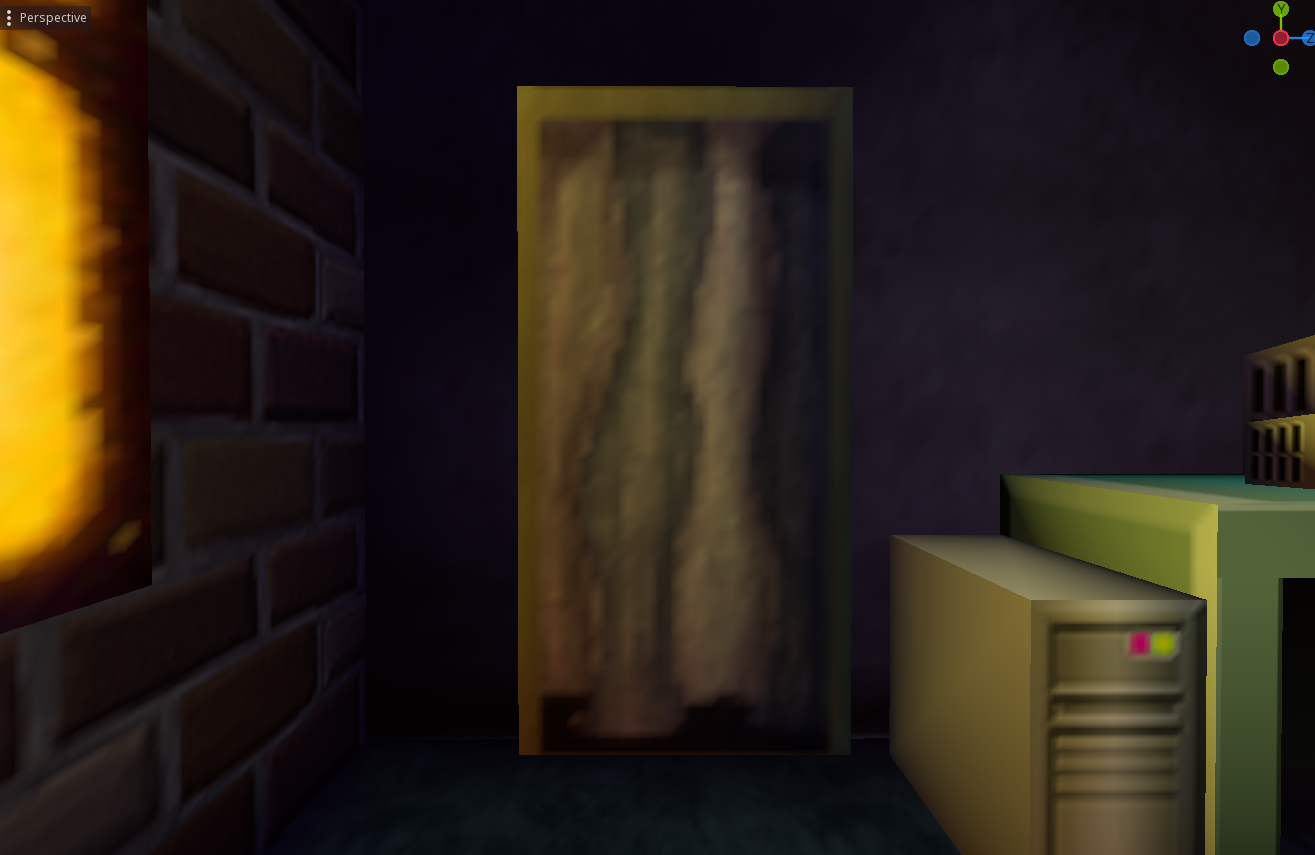
See, the idea was for Urchin's closet to be missing its door, so they hung up a curtain over it as a soft-doorway. As I am still fairly new to texture painting I have no idea how to render cloth or fabric, and I think it shows here pretty clearly!!
…and yet, I've had several players point this out to me as an example of really good texture-work??
In all honestly I don't understand it myself, but I think it does highlight an important aspect of the N64 aesthetic: when your output resolution is already so low, sometimes you can get away with things you otherwise couldn't. Sure, it looks a bit shit, but mangled through 240p and an NTSC filter you can barely tell! A crummy cloth texture isn't going to ruin your game xD
And lastly, honestly, one of my proudest things on this project… and it is never seen in the final game. I present, the lightswitch:
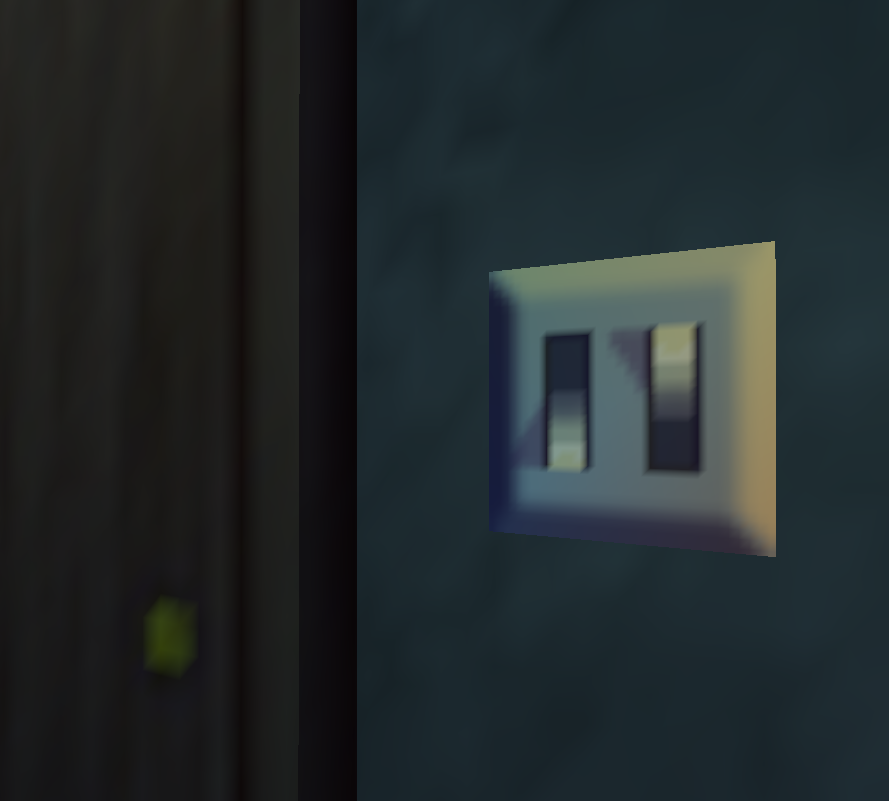
So yeah, I think 32 x 32px is a bit much for a small lightswitch texture, this could stand to be 16px and probably work fine. But! While most of the textures were painted or filtered noise of some sort, this one damn texture I filled in pixel by pixel. And I adore how it turned out. You've got the interesting colors from all the surrounding ambient light mixed in, the switch for the light is flicked down while the ceiling fan is set on, and the lil shadows formed by the switches. It's good stuff… and because the the script was only finished with 24 hours to the jam deadline, I had to throw together the camera angles rather hastily. Ah well, maybe next time!
Wrap Up
I'll end it there, though there's still a lot I haven't touched on: Urchin's model and animation, the ocs and script, the tangled spaghetti code slapped into place for a 2 week jam, etc. If folk are interested in more of this type of thing I might do another one? I dunno, let's see. Thanks for reading and/or playing!! >w<
Leave a comment
Log in with itch.io to leave a comment.